Wood inlays can add a unique dimension to a project. There are advantages for woodworkers in making template sets to facilitate creating complicated inlays. I am extremely impressed with those capable of freehand artistry, but alas, I am not one of those rare people. With templates, I can hone my image renditions until they look exactly how I would like them to look, and have the ability to make multiple copies once I get the inlay that looks great.

to see the inlay.

I recently purchased a router inlay kit to spice up a few of my woodworking projects. While there are a few commercial templates for inlays, information for creating one's own template sets is scanty. Instructions that came with the kit indicated a need to account for the distance between the router template guide's OD and the bit -- not a great deal of information to get you going.
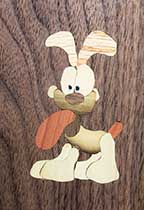
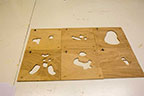
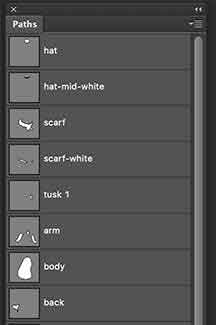
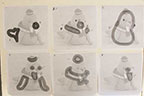
Making your own template sets can be a bit daunting. If one looks at a template next to the wood piece it will generate, it is difficult to recognize similarities. The template on the right generates the arms, eyes, part of the hat, and the right tusk. Making a template set is no trivial matter!
My first attempts at making my own template sets were manual. I needed a ruler to make the cutout outline larger than the inlay piece to account for the router bit and guide. It was as if I used a compass to make a circle around each point on an image outline. It worked out OK, but it was tedious and not worth the time it took. I needed a faster, more accurate way to do this! After considerable internet-based research, I found very little.
Photoshop to the Rescue!
Then I remembered the power of Photoshop (as well as other vector based graphics programs). The stroke (thickness) of a vector path is easy to alter, and can be set to account for the distance referred to in the kit’s instructions. Photoshop generates perfect printouts to transfer to templates!
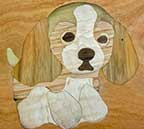
Here is a complete set of templates for the inlay in this example. →
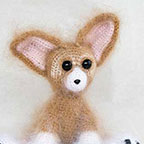
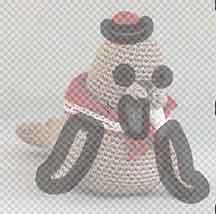
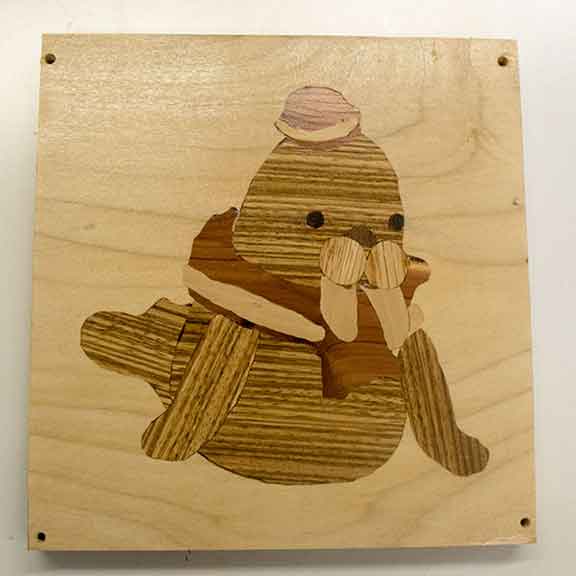
In the following section, I will show you exactly how I created an inlay template set featuring a walrus my wife knitted. Familiarity with Photoshop (or other vector program) is necessary. Here are the details:
1. Find an image
Open an electronic image of the object you want to inlay in Photoshop.
- Obtain an image of your future inlay. You might want to photograph or scan an object.
- Open the image in Photoshop. Resize image to the size of your final inlay. Copy the layer and make the original image layer invisible. This way, you can manipulate your image without destroying the original.
- Clean the copied image layer by removing any extraneous background pixels.
2. Set Up Photoshop
- Increase the canvas size to be slightly smaller than the desired size of your template sheets. The templates should be 2-3” larger than the inlay size. For a 5” inlay, I made the canvas 6” with 7" templates. The larger size is necessary to provide room for registration points on the template.
- Make registration marks: Select File:Print…, scroll down to Functions:Border andmake a 1 px border. The four corners will be the registration points when printed. I used these registration points to anchor (screw) the templates to the wood holding the inlay with screws.
- Change the opacity of the visible layer so it is dim, yet visible. I use about 50%. If the image is too bright, it will be difficult to see the paths you will draw.
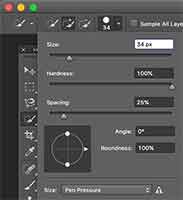
- Select the brush tool. Change the brush opacity to 40-50%. Select a solid, hard, black circle. If the opacity is too great, it will waste ink and make it difficult to see where you drew the outline when you transfer it to the template.
-
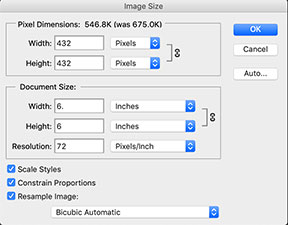
Now for the critical step: Set the stroke width to account for the distance from the template guide to the routed inlay piece. THE SKINNY OF IT: 34px FOR A 72dpi IMAGE; 141px FOR A 300dpi IMAGE, if using a Whiteside Inlay Kit. Here’s how this was calculated:
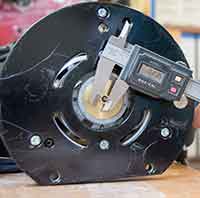
- Remove the collar on the inlay kit's router guide. Use a caliper to measure the distance from the outer edge of the guide to the far end of the 1/8" bit in the router.
- Alternatively, you can tape (or clamp) a scrap piece of ¼” plywood (template wood) with a straight side onto a scrap piece of wood. Using the inlay kit with the collar off, route a small dado in the scrap, keeping the guide pressed against the ply. Using a caliper, measure the distance from the plywood to the far edge of the dado. My kit (Whiteside Solid Brass Inlay Kit) yields 0.235”.
- Find the resolution of your image (Image:Image Size:Resolution). In this example, I have 72 ppi (pixels per inch).
- Determine how many pixels you need for half of a stroke by multiplying the resolution (px/inch) by the distance you measured. I have (0.235”) * (72 ppi) = 16.92 px.
- Set the brush stroke to double this amount, or 34 px.
- For images with a 300 ppi resolution, I would set the stroke to 141 px: (0.235 in) x (300 px/in) x 2 = 141 px.
3. Draw Vector Paths for each Inlay Piece.
Now, you need to decide how many difference pieces of wood will make up the inlay, and what order each piece will be laid. A path must be made to outline each inlay piece.
- Open the Path window. One way to make a path is to select the pen tool and draw a path around the first part of the image to inlay.
- Alternatively, select the region of the image you want, then, on the Path window, ctrl-click the 'Make work path from selection' icon at the bottom of the window. Choose a low tolerance to make the path follow the edges of the selection more closely.
- Name the path to describe the outlined item.
- Make a new path (click the 'Create new path' icon next to the trash icon in the Path window) and draw an outline of the 2nd piece to inlay -- or just select the region and convert the selection to a path. Name it.
- Repeat for each part of the image that will correspond to a new piece of wood, making a new path for each. I made 13 paths for the walrus, so I will be cutting out 13 different pieces of wood (two eyes, arms,tusks, and cheeks; hat, hat band; scarf, scarf band; body. Next time, I'll make more pieces for the scarf!)
- TIP: I overlap many of the pieces, laying in the pieces which appear behind others first. Where two edges meet, I draw the path of the rear piece so that it overlaps where the front piece will go. This overlap will be routed away when the front piece is layed in. This eliminates potential gaps between the two pieces that might occur if there is some error involved. I number (and name) each path in the order that they will be placed in the final wood. This number is also written on the template cutout.
4. Stroke paths onto layers.
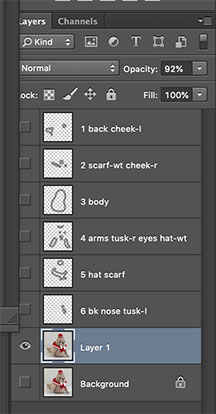
Now you need to make unique layer representing each plywood template sheet. You will stroke a path (or several paths) onto a layer and make a printout of the layer. This printout will be used to transfer the pattern outline(s) onto the plywood template. Here’s how to do that:
- Make a new, empty layer and label it with the path number(s) and a description of the inlay piece(s) (e.g. Nose or Left eye). Two layers should be visible: the dim copy of the image and this new layer.
- NOTE!: If you forgot to size the image to exactly the size you want for the inlay, do it now! Once you stroke the path, it will not resize correctly if you change the image size! Check the resolution and be sure the brush stroke matches!
- Highlight the first path. Stroke the path onto the new layer.
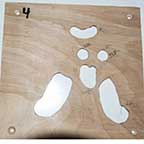
To reduce the number of template sheets, you may want to stroke more than one path on a layer before printing. One layer can hold several paths, so long as they are not close to each other. They cannot touch or be within a ¼” or so, or the router may break through between paths and destroy both. The image on the right has 6 path strokes: Two arms, both eyes, a tusk, and part of a hat. - Make a printout.
- Next to each path, copy the path label. This will help you to identify the various parts of the image you will be working with later on, as well as the order of routing each piece.
- Turn the visibility of the newest layer off.
- Make a new layer. From the Paths window, highlight another path and stroke it onto the new layer. Make a printout.
- Repeat this until every path has been printed.
5. Make the plywood template sheets.
- Alignment is critical here at all stages!
- Cut as many ¼” plywood (plastic, hardboard, etc) sheets as you have layers. The sheets s/b larger than the registration points on the printouts, as you will drill holes in the templates at these registration points. Make all of the sheets the same size.
- Label each template sheet, using the layer label numbers at the top of each printout.
- Stack all of the ¼” template sheets together, making sure all of the sides are aligned. Tape them to keep the edge alignment true.
- Place one of the printouts onto the top ply sheet and mark the registration points onto the plywood with a scratch awl. The 4 corners will be the registration points. These points s/b atleast 3/8" from the edge.
- Using a drill press, drill 4 holes in the stack, aligned exactly with the 4 registration points on the printout. The holes should be just big enough to put a screw through (I used #6 1/2" screws).
- Countersink all of the holes.
6. Transfer the outlines to the plywood template sheets.
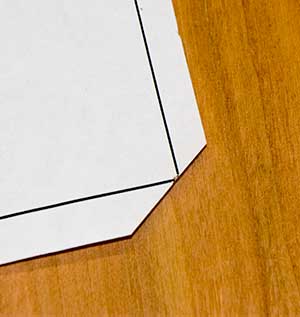
- TIP: Trim the printout so that the edges of the paper are close to the border. Clip each of the four edges so that the registration mark JUST touches the edge. Note the picture.
- Using the first printout and plywood template sheet, carefully align the registration points of the printout exactly over the four template holes. Tape the printout to the plywood on two adjacent sides, being sure to keep the registration points of the paper over the holes in the template.
- Place carbon paper between the two. Transfer the outer stroke outlines of each path from the printout to the plywood.
- Repeat this for each pair of printout / plywood sheets.
7. Cut out the plywood template outlines.
- Now that the inlay outlines are transferred to the plywood, you need to cut them out. If the cutouts are large, use a scroll saw or bandsaw to rough cut the templates out, keeping away from the outline by 1/16” – 1/8” or so. If it has small parts, just use forester bits to hog out the centers of each area to be removed on the template.
- Use a router table with a straight bit (or a scrollsaw) to trim the cutouts to the final edge. Repeat this for each plywood sheet.
Now you have a template set! See how easy that is? 😊 Now you can finish making the inlay with this template set as you normally would!
I welcome your comments below. Let me know if you need instructions on how to proceed from here.
Gallery


Comments
(Submitted comments will be reviewed and posted when deemed from a real person, as well as appropriate to this site!)
Thanks for visiting! If you have a desire to make complex inlays -- and have a good vector-based program, I think you will find this site very useful. Please let me know if you have any questions or suggestions!